There’s something undeniably enchanting about the simple alchemy of flour, water, and wild yeast coming together to create a loaf that’s as centuries-old as it is timeless. Mastering classic homemade sourdough is more than just baking; it’s a journey into tradition, patience, and the art of nurturing a living culture. In this guide, we’ll unravel the secrets behind that perfect tangy crust and tender crumb, offering you a hands-on approach to crafting sourdough bread that not only honors its storied past but also transforms your kitchen into a haven of hearty, wholesome comfort. Ready to embark on this tasty adventure? Let’s dive into the timeless recipe that has captured hearts and tables around the world.
Mastering Classic Homemade Sourdough: A Timeless Recipe guide
Mastering classic homemade sourdough begins with understanding the gentle rhythm of nurturing your living culture and embracing the craft of fermentation. This age-old technique, rooted deeply in artisanal baking traditions, transforms simple ingredients into an aromatic loaf boasting a crispy crust and tender crumb. Weather you’re a passionate home baker or just starting out, unlocking the secrets of timing, temperature, and technique will elevate your sourdough to bakery-quality perfection.
Prep and cook Time
- Starter Readiness: 7 days (active feedings each day)
- Dough Fermentation: 8-12 hours (bulk fermentation + proof)
- Baking Time: 40-50 minutes
- total Active Time: Approximately 1.5 hours spread across stages
Yield
One rustic 9-inch sourdough boule serving 8-10 slices, perfect for sharing and savoring.
Difficulty Level
Medium – ideal for bakers agreeable with patience and eager to explore traditional bread-making.
Ingredients
- 100g active sourdough starter (fed and bubbly)
- 500g bread flour (high protein, unbleached)
- 350ml lukewarm water (around 75°F / 24°C)
- 10g fine sea salt
Instructions
- Mix and Autolyse: In a large bowl, combine the bread flour and lukewarm water until just combined, no dry flour remains. Cover and let rest for 45 minutes to 1 hour. This hydrating step kickstarts gluten formation and enzymatic activity.
- Add Starter and salt: Gently fold in the active sourdough starter and salt.Use your hands or a dough scraper to incorporate thoroughly without deflating the mixture too much.
- Bulk Fermentation: Cover the dough with a damp cloth or plastic wrap and leave at room temperature (ideally 70-75°F) for 4-6 hours. Perform stretch and folds every 30 minutes during the first 2 hours to develop structure and elasticity.
- Pre-shape: On a lightly floured surface, gently turn the dough out and shape into a loose round. Cover with a towel and rest for 20 minutes.This resting relaxes the gluten for the final shaping.
- final Shaping: Tighten the dough into a taut boule or batard by folding edges underneath and creating surface tension. Place seam-side up into a heavily floured proofing basket (banneton) or a bowl lined with a floured kitchen towel.
- Proof: Let the dough proof at room temperature for 1.5-2 hours or retard overnight in the refrigerator for 8-12 hours. This slow proof develops complex flavors and lends the crumb a beautiful open texture.
- Preheat Oven and Dutch Oven: At least 45 minutes before baking, preheat your oven to 475°F (246°C) with a Dutch oven inside to ensure maximum heat retention and proper steam.
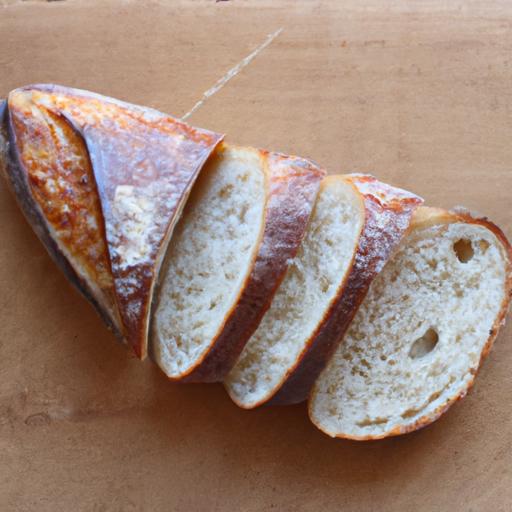
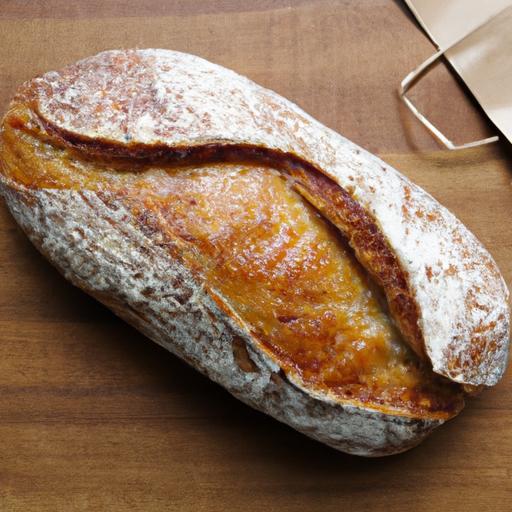
- Score the Loaf: carefully invert the dough onto parchment paper, seam side down. Using a sharp lame or serrated knife, make shallow, confident slashes in preferred patterns – such as a central slash or an ear-shaped cut. Scoring controls oven spring and adds visual artistry.
- Bake: Transfer the loaf with the parchment into the hot Dutch oven. Cover and bake for 20 minutes, than remove the lid and bake an additional 20-25 minutes until the crust deepens to a caramelized amber and crackles audibly.
- Cool: Remove bread from the oven and transfer to a wire rack. Allow to cool completely for at least 2 hours before slicing to let the crumb set perfectly.
tips for Success
- Nurturing your starter: Feed your starter with equal parts flour and water, maintaining a consistent room temperature to promote bubbly activity.If it’s sluggish,try warmer environments or slightly adjust hydration.
- Temperature control: Maintaining fermentation temps between 70°F-75°F creates optimal yeast performance.Cooler temps slow fermentation and enrich flavor, while warmer temps accelerate rise but risk overproofing.
- Shaping and scoring: Use light dusting of flour on your banneton to prevent sticking but avoid excessive flour on your dough surface before scoring; it can cloud oven spring.
- Steam importance: Baking inside a Dutch oven traps steam, essential for a blistering, crispy crust. If you don’t have one, use a baking tray with hot water in your oven bottom.
- Troubleshooting: If your loaf is dense, your starter might be inactive or your fermentation time was too short. If overly sour, shorten fermentation or feed starter more frequently.
Serving Suggestions
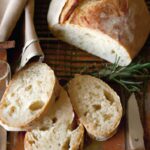
Slice your artisan loaf thick or thin, then lightly toast to unlock nutty aromas. Serve with high-quality extra virgin olive oil for dipping, or slather generously with creamy ricotta and a sprinkle of fresh herbs such as thyme or rosemary.Pair sourdough with vibrant tomato bruschetta, golden roasted garlic butter, or a hearty vegetable stew to bring out its signature tangy depth.

| Nutrient | per Serving (1 slice) |
|---|---|
| Calories | 120 kcal |
| Protein | 4 g |
| Carbohydrates | 24 g |
| Fat | 0.5 g |
For a deeper dive into fermentation science and advanced shaping techniques, explore our related artisan bread fermentation guide.To further understand the microbiology behind sourdough, the ScienceDirect review on sourdough microbiota offers valuable insights.
Q&A
Q&A: Mastering Classic Homemade Sourdough: A Timeless Recipe Guide
Q1: What makes sourdough bread different from regular bread?
A1: Sourdough bread is unique as it relies on a natural fermentation process using wild yeast and beneficial bacteria found in the environment. This creates a tangy flavor, airy texture, and a crust that’s both crunchy and deeply satisfying, setting it apart from breads leavened with commercial yeast.
Q2: How do I start a sourdough starter from scratch?
A2: Starting a sourdough starter is like nurturing a tiny ecosystem. Mix equal parts of whole wheat or rye flour and water, then let it rest at room temperature. Feed it daily with fresh flour and water,discarding a portion each time,until it bubbles and doubles in size-a sign that your wild yeast is thriving and ready to bake with.
Q3: Why is feeding the starter regularly important?
A3: Regular feeding keeps your starter healthy and active by providing fresh nutrients for the wild yeast and bacteria.Neglecting feedings can weaken the starter, slowing fermentation and affecting the rise and flavor of your bread.
Q4: Can I use any type of flour for sourdough baking?
A4: While you can experiment with many flours, whole grain flours like whole wheat and rye tend to encourage a vibrant starter because of their rich nutrient content. All-purpose and bread flours also work beautifully for the dough,offering a lighter crumb.
Q5: What is the ideal hydration level for a classic sourdough dough?
A5: Classic sourdough recipes ofen hover around 70% hydration, meaning 70 grams of water for every 100 grams of flour. This ratio gives a lovely balance-a dough that’s easy to handle yet yields an open crumb with those signature sourdough air pockets.
Q6: How can I tell when my dough has fermented enough during bulk fermentation?
A6: Look for your dough to rise noticeably, though not double, with bubbles forming on the surface and sides. the dough should feel lighter and slightly airy. The window for perfect fermentation depends on temperature, but generally 3 to 5 hours at room temperature is a good guideline.
Q7: What’s the secret to getting a crispy crust on sourdough?
A7: Two key tricks are baking your loaf in a preheated Dutch oven or covered baking vessel to trap steam, and then removing the cover toward the end to finish with dry heat. This environment helps develop that golden, crackling crust sourdough enthusiasts crave.
Q8: Why is scoring the dough important before baking?
A8: Scoring-the artful slicing of the dough’s surface-controls how the bread expands in the oven. It’s a creative flourish that prevents random cracks and produces those beautiful patterns synonymous with artisan sourdough.
Q9: How should I store my sourdough bread for maximum freshness?
A9: Keep your loaf wrapped loosely in a cotton or linen bread bag at room temperature to maintain the crust’s crunch while allowing the crumb to breathe. Avoid plastic bags, which can trap moisture and make the crust soggy. If you need to store it longer, slice and freeze the bread, then toast slices directly from the freezer.
Q10: What are some common troubleshooting tips for beginner sourdough bakers?
A10: Patience is key! If your starter is sluggish, try feeding it more frequently or adjusting the temperature. A dense crumb frequently enough means under-proofing-allow more time for fermentation. Overly sour bread can come from over-fermentation, so pay close attention to timing. And above all, embrace the learning process; each loaf teaches you something new.
Feel empowered to dive into the timeless craft of sourdough baking-where science, nature, and creativity beautifully converge in every loaf!
Closing Remarks
As the final crumbs of your homemade sourdough fade, remember that mastering this timeless craft is more than just following a recipe-it’s a journey through history, patience, and a bit of alchemy. Each loaf you create carries the whispers of centuries, transformed by your hands into a warm, crusty masterpiece. So, whether you’re a seasoned baker or just beginning your sourdough story, keep nurturing your starter and embracing the rhythms of fermentation. With every rise and every bake, you’re not just making bread-you’re continuing a delicious tradition that connects us all. Happy baking, and may your kitchen always be filled with the irresistible aroma of freshly baked sourdough!