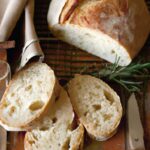
there’s something undeniably comforting about the aroma of freshly baked bread wafting through the kitchen-especially when it carries the rich, earthy notes of olives and the creamy indulgence of cheese.Rustic Homemade Olive & Cheese Bread is more then just a loaf; it’s a savory journey that blends tradition with simple, wholesome ingredients. Whether enjoyed warm from the oven or as the perfect accompaniment to a hearty meal,this bread embodies a timeless appeal that’s both rustic and refined. In this article, we’ll explore the art of crafting this savory delight, uncovering tips, techniques, and flavors that bring each bite to life.
Rustic homemade olive & cheese bread offers a wonderfully hearty experience that celebrates the charm of customary baking with a modern twist. This loaf combines the aromatic allure of hand-selected olives and the creamy decadence of artisan cheeses baked into a golden crust with a tender, open crumb. Whether enjoyed fresh from the oven or toasted the next day, this bread stands as a testament to simple ingredients elevated by thoughtful technique.
Prep and Cook Time
- Planning: 20 minutes
- Rising Time: 1 hour 30 minutes
- Baking Time: 35-40 minutes
- Total Time: Approximately 2 hours 30 minutes
Yield
- 1 rustic loaf (serves 8-10)
Difficulty Level
- Medium – ideal for bakers with some experience in working with yeast doughs
Ingredients
- 3 ½ cups all-purpose flour, sifted
- 1 ¼ cups warm water (about 105°F/40°C)
- 2 teaspoons active dry yeast
- 1 ½ teaspoons fine sea salt
- ½ cup pitted Kalamata olives, coarsely chopped
- ½ cup pitted Castelvetrano olives, halved
- ¾ cup sharp aged cheddar cheese, cubed
- ½ cup crumbled feta cheese
- 1 tablespoon extra-virgin olive oil
- 1 teaspoon fresh rosemary, finely chopped (optional)
Instructions
- Activate the Yeast: In a small bowl, sprinkle the active dry yeast over the warm water.Let it sit for about 5-7 minutes until foamy. This indicates the yeast is active and ready to leaven your dough.
- Mix Dry Ingredients: In a large mixing bowl, combine the sifted flour and sea salt. Make a well in the center and slowly pour in the yeast mixture and olive oil, stirring gently with a wooden spoon until a shaggy dough forms.
- Knead the Dough: Transfer dough onto a lightly floured surface. knead for 10 minutes until smooth and elastic, adding flour sparingly to avoid overdrying. The dough should feel slightly tacky but not sticky.
- First Rise: Place the dough in a clean, oiled bowl and cover with a damp cloth or plastic wrap. Let it rise in a warm draft-free area for 1 to 1.5 hours, or until it doubles in size.
- Incorporate Olives and Cheeses: Gently deflate the dough and spread it on a lightly floured board. Evenly scatter the chopped olives,cheddar cubes,and crumbled feta over the surface. Fold and gently knead just until the additions are evenly distributed without overworking the dough.
- Shape and Second Rise: Shape the dough into a round or oval loaf. Place it on a parchment-lined baking pan or a preheated baking stone. Cover loosely and let it rise for 30 minutes until puffy.
- Create Crust texture: Prior to baking, lightly dust the top with a pinch of flour and score shallow slashes with a sharp knife to guide crust swelling.
- Bake to Golden Perfection: preheat the oven to 450°F (230°C). Place an oven-safe dish with water on the bottom rack to create steam. Bake the bread on the middle rack for 35-40 minutes until the crust is deeply golden and sounds hollow when tapped. Rotate halfway through baking for uniform color.
- Cool Properly: Transfer the bread to a wire rack and cool entirely before slicing. This step prevents a gummy crumb and allows the flavors to develop fully.
Chef’s Notes: Tips for Success
- Choosing Olives: Kalamata olives provide a robust, tangy note, while Castelvetrano olives contribute buttery softness and subtle sweetness. Combining both adds complex texture and flavor to your loaf.
- Cheese Selection: Sharp cheddar offers a rich, tangy punch; feta contributes crumbly tang and saltiness. For a creamier crumb, experiment with mozzarella or aged gouda, but avoid overly moist cheeses that affect dough hydration.
- Steam Baking: Adding steam in the oven mimics professional bakery conditions, encouraging the crust to develop that coveted blistered, rustic appearance.
- Make-Ahead: After the first rise, you can refrigerate the dough overnight, tightly covered.Let it come to room temperature before shaping and the second rise.
- Storage: Keep wrapped loosely in a cotton towel or paper bag at room temperature for up to 3 days. refresh slices by toasting to regain crust crispness.
Serving Suggestions and Perfect Pairings
Slice this rustic homemade olive & cheese bread thickly to reveal swirling pockets of olives and gooey cheese. Serve warm alongside a bowl of hearty tomato basil soup for a comforting meal. A drizzle of high-quality extra-virgin olive oil and a sprinkle of fresh cracked black pepper amplify each bite.
for a sophisticated appetizer, top toasted slices with whipped ricotta, a sprinkle of fresh thyme, and cracked zest of lemon to balance richness. Complement the bread with crisp vegetables like roasted red peppers or artichoke hearts.A chilled glass of herbal iced tea or sparkling water with fresh herbs harmonizes beautifully.

| Nutrient | Per Serving (1 slice) |
|---|---|
| Calories | 210 kcal |
| Protein | 7 g |
| Carbohydrates | 30 g |
| Fat | 6 g |
For further inspiration, explore our in-depth guide on artisan bread techniques to master rustic dough textures and elevate your baking craft.
Q&A
Q&A: Rustic Homemade Olive & Cheese Bread: A Savory Delight
Q1: What makes Rustic Homemade Olive & Cheese Bread so special?
A1: This bread combines the hearty,chewy texture of traditional rustic loaves with the bold,briny punch of olives and the rich,creamy melt of cheese. It’s a perfect blend of savory flavors and satisfying textures that brings both comfort and sophistication to your table.
Q2: which types of olives are best for this bread?
A2: Kalamata, green Castelvetrano, or black oil-cured olives work beautifully. Kalamata olives add a fruity tang, Castelvetrano olives bring a buttery, mild sweetness, and oil-cured olives deepen the overall umami richness. Just be sure to pit and roughly chop them before folding into the dough.
Q3: What kind of cheese should I use for the best flavor and melt?
A3: Semi-hard cheeses like aged cheddar,Gruyère,or Asiago provide an excellent balance of meltability and sharpness. for a milder, creamier note, you could also try mozzarella or fontina. Combining two cheeses can add complexity and depth.
Q4: Can I make this bread without a bread machine?
A4: Absolutely! This loaf is wonderfully rustic, so hand-kneading or using a stand mixer works just as well. The key is developing good gluten structure for the chewy crumb, so knead until the dough is smooth and elastic before adding olives and cheese.Q5: How do I keep the olives and cheese from sinking to the bottom of the bread?
A5: Gently fold the olives and cheese into the dough after the initial kneading, when the gluten has developed but before proofing.This helps distribute the mix-ins evenly without deflating the dough.
Q6: Can I customize the bread with herbs or spices?
A6: Definitely! Rosemary,thyme,or oregano pair wonderfully with olives and cheese for a Mediterranean vibe. A pinch of cracked black pepper or red chili flakes can add a subtle kick, enhancing the savory profile.
Q7: How long does this bread stay fresh, and what’s the best way to store it?
A7: Because it’s a crusty artisan loaf, it’s best enjoyed within 2-3 days for optimal texture and flavor. Store it wrapped loosely in a linen cloth or paper bag at room temperature to maintain the crust’s crispness and prevent molding.
Q8: What occasions is this bread perfect for?
A8: From casual weekend breakfasts with a smear of butter to elegant dinner parties as a side or appetizer, this bread’s versatility shines. It’s also fantastic for picnic sandwiches or simply sliced with fresh fruit and nuts.Q9: is this recipe suitable for novice bakers?
A9: Yes! Rustic breads are forgiving and don’t require precise shaping or intricate techniques. With some patience for rising times and basic mixing, even beginners can bake a loaf that looks and tastes remarkable.
Q10: Can this bread be frozen?
A10: It can! Wrap the cooled loaf tightly in plastic wrap and then foil to protect from freezer burn. Thaw at room temperature,and to revive the crust’s crunch,pop it in a warm oven for a few minutes before serving.
Enjoy baking your own Rustic Homemade Olive & Cheese Bread-a savory journey that fills your kitchen with warmth and your palate with satisfying, layered flavors!
In Summary
As the comforting aroma of freshly baked olive and cheese bread fills your kitchen, you’ll realize that this rustic homemade delight is more than just a treat-it’s a celebration of simple, timeless flavors. Whether enjoyed warm alongside a hearty stew or sliced thin for a savory snack, this bread brings a touch of artisanal charm to any meal. So, roll up your sleeves, gather your ingredients, and let the soulful art of baking transport you to a cozy countryside bakery, where every bite tells a story of tradition, taste, and heartfelt craftsmanship. Your savory journey has just begun.